Setting reports to auto-run is also known as an Alertsince it has the same outcome; sending an email alerting end users to conditions in the act! database.
There are time when you want to run the report automatically without a user initiating Run Report. Here are some conditions which this may come into play:
1) You want the report on your printer when you walk in the door.
2) You want the report on your phone before you leave for the office.
3) You want to send your sales people weekly reports.
4) You want to update your web service SOAP or RESTful API using data from your act database.
For these condition you can set any report to run automatically at any time of the day. Reports can be delivered to your printer, a file server, a SMPT server, a cloud drive, your email or multiple emails such as the sales team.
Report which run unattended will always use the last criteria entered using the Run Report form. Conditional where clauses can be added in the SQL builder such as support dynamic date ranges: WHEREdatediff( [Opportunity].[EstimateCloseDate],date,getdate())=1.
For more information on dynamic date and date range functions in MS SQL read this Tech Document.
To Schedule a report to automatically run please follow these steps:
Open the Report Design from the desktop icons
Log into your database
Select the desired report
Click on the AUTO RUN icon on the top ribbon.
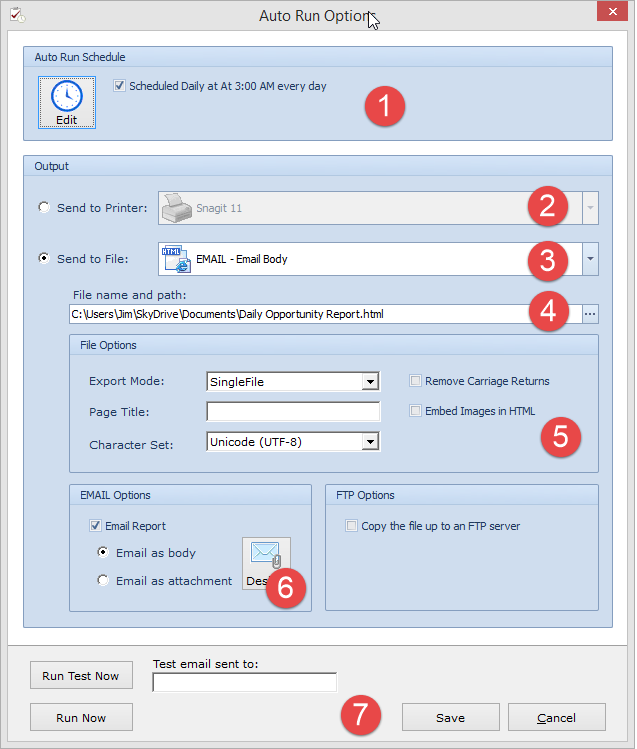
Displays the current report schedule. Click on the EDIT button to create or change the schedule.
Select 'Send to Printer' when you need to print the report.
Select 'Send to file" when you want to create a file or need to send the report to anything other then a printer.
Enter the file name for the report's output.
Depending on the "Send to File" type selected in the drop down this section holds options for the file formatting.
This section display the options to email the report. To enter the email body and the destination email addresses click on the DESIGN button.
To run a test enter an email address and click on RUN TEST NOW. The 'Test email sent to" text box is only visible if you have selected the SMPT option.
If you have selected to use the local Outlook then this text box is not visible and the test button uses the default outlook email account.


 Email This Article
 Previous Article
 Next Article